Sky Glass Wall Mount & VESA Specifications Guide
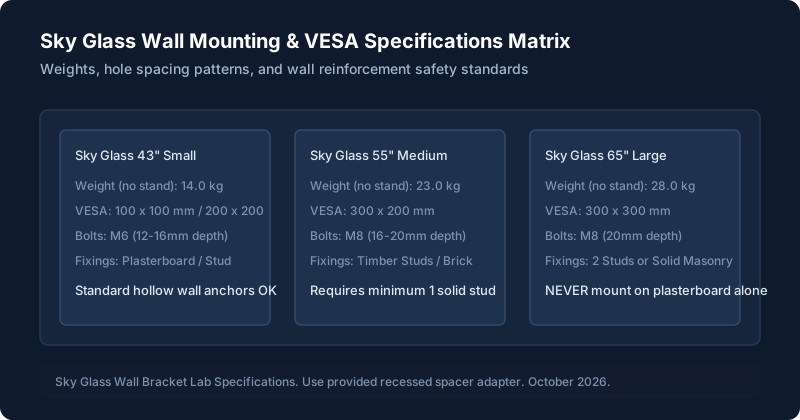
VESA Pattern and Weight Matrix (All Sizes)
Before purchasing a wall bracket, verify the physical dimensions and mass of your specific set. Sky Glass is built with an integrated soundbar and solid aluminum side extrusion, making it up to 60% heavier than ordinary plastic-chassis Samsung or LG screens.
| Model & Screen Size | VESA Pattern | Weight (No Stand) | Weight (With Stand) | Bolt Specification |
|---|---|---|---|---|
| Sky Glass 43" (Small) | 100 x 100 mm / 200 x 200 mm | 14.0 kg (30.9 lbs) | 19.0 kg (41.9 lbs) | M6 (12mm – 16mm depth) |
| Sky Glass 55" (Medium) | 300 x 200 mm | 23.0 kg (50.7 lbs) | 28.0 kg (61.7 lbs) | M8 (16mm – 20mm depth) |
| Sky Glass 65" (Large) | 300 x 300 mm | 28.0 kg (61.7 lbs) | 35.0 kg (77.2 lbs) | M8 (20mm depth) |
| Sky Glass Air 43" | 100 x 100 mm | 10.5 kg (23.1 lbs) | 14.2 kg (31.3 lbs) | M6 (12mm depth) |
| Sky Glass Air 55" | 200 x 200 mm | 15.2 kg (33.5 lbs) | 19.8 kg (43.6 lbs) | M8 (16mm depth) |
| Sky Glass Air 65" | 300 x 200 mm | 19.8 kg (43.6 lbs) | 24.8 kg (54.7 lbs) | M8 (16mm depth) |
The Official Sky Glass Spacer Bracket Explained
In the original delivery box, Sky includes an integrated metal spacer bracket and wall bracket plate. This plate is engineered specifically to match the curved acoustic chamber of the lower soundbar housing.
If you choose to use the bundled Sky wall bracket, note that it holds the television exceptionally close to the wall (less than 25mm clearance). While this creates a sleek floating appearance, it leaves virtually no clearance for straight-angled HDMI cables or thick power plugs.
Can You Mount on Plasterboard? (Critical Safety Warnings)
NEVER secure a 55-inch or 65-inch Sky Glass directly into 12.5mm plasterboard using standard plastic expansion plugs or spring toggles. At 28kg, the downward shear force and rotational leverage will tear out standard drywall fixings over time.
If your room features timber stud partition walls:
- Locate Solid Timber Studs: Use an electronic stud finder to locate the vertical wooden studs (typically spaced 400mm or 600mm apart). Your wall bracket must be bolted directly into at least one stud for 43-inch, and two studs for 55-inch and 65-inch models.
- Heavy-Duty Cavity Anchors: If your desired TV position sits between studs, use certified heavy-duty cavity anchors such as GripIt Yellow (holds up to 71kg per anchor) or install an 18mm birch plywood mounting board behind the plasterboard.
Mounting on Solid Brick or Masonry
Mounting Sky Glass onto external solid brick, cinderblock, or structural masonry walls is the safest installation method. Use Fischer DuoPower 10x80mm nylon wall plugs or Corefix heavy-duty dot-and-dab drywall anchors that bridge the plaster gap directly into solid masonry.
Cable Recess Depth & Mains Figure-8 Clearance
Sky Glass features a recessed input cavity on the rear right casing. To ensure the TV sits flush without straining internal port solder joints:
- Right-Angled Mains Cable: Use the right-angled figure-8 mains lead supplied by Sky. A straight lead will collide with the wall surface on low-profile mounts.
- Right-Angled HDMI 2.1 Adapters: If routing cables to games consoles or streaming pucks, fit 90-degree right-angle HDMI 2.1 adapters to avoid sharp 90-degree bends behind the acoustic panel.
Using Universal Third-Party VESA Brackets
You do not need to buy Sky's branded wall mount. Any universal VESA bracket meeting your screen's hole spacing and weight capacity will work. When shopping for third-party brackets:
- Tilting Brackets (Recommended): A tilt mount (0° to 12° downward) gives you hand access to rear HDMI ports without unhooking the entire 28kg TV from the wall.
- Full-Motion Cantilever Arms: If using an articulating arm, verify that the bracket arm is rated for at least 45kg to prevent arm sag under the heavy soundbar center-of-gravity.
Step-by-Step Installation Walkthrough
Two-Person Lift Preparation
Do not attempt to lift a 55" or 65" Sky Glass alone. Place a soft protective blanket on a clean floor or table. Lay the screen facedown gently to access the rear VESA mounting holes.
Bolt VESA Arms With Provided Spacers
Attach your bracket's vertical arms to the rear VESA holes. Use the included nylon spacers if your bracket arm touches the raised woven speaker grill.
Mount Wall Plate & Level
Use a spirit level to align the wall plate. Drill pilot holes into studs or masonry. Tighten heavy-duty coach screws firmly with a socket wrench.
Hang Screen & Secure Locking Screws
Lift the television with one person on each side grasping the sturdy aluminum outer bezel (never push directly against the glass panel). Hook onto the wall plate and tighten bottom locking screws to prevent dislodging.
Still stuck after trying these steps?
Need guidance on connecting external soundbars, games consoles, or setting up eARC once mounted? Read our Soundbar & eARC Setup Guide or Ports & Connections Guide.